|
|
Building the Camp

Survey the lot
The first thing you need to do on arrival is park somewhere out of the way and not crush the nice hard playa near the front of the camp where we will have our public spaces. Then locate the four corner markers for our lot, and measure the sides to check that they are as advertised. Note that the back will be longer than the front. if the radial sides are not straight then with a visible stake at one front corner run the 300 foot tape back and line it up with the man, and move the marking flags next to the tape. All radial sides of each lot line up with the man. Note its best to do this discreetly after the placers have left you to your own devices.
Layout the main structure
Centerline
Get some short rebar stakes, a one-handed sledge hammer and the 100 and 300 foot tape measures. Locate where the center of the front of the main structure should go. It will be set back from the edge of the road (The imaginary line between our corner markers) by 20 or 30 feet per the map. The structure is 60 feet wide and 80 long but the guy ropes go another 15 or 20 feet out from there. So you could say it approaches 100 feet wide. Keep in mind that the main structure is made up of 20 foot square modules, so everything is done on a 20 foot grid. Put a stake in at the very front and center line of the structure. This is the front edge of the front dome. Then measure back 80 feet. The next step is critical: line up the tape measure very carefully with the man (or the man's base) and put a stake in at 80 feet. You will have to get down on your stomach like you are going to do pushups and sight down the stake line. Now put stakes in at 20, 40, and 60. Keep the tape tight and afterward sight down the stakes and double check that they are all in a line. Everything is measured off of these stakes so this part is critical to get right if you want the structure to look good. See: http://www.eugeneweb.com/gallery2/v/clif/BM/Structre_Setup/Container
By the way now would be a good time to locate where the container goes. It is placed relative to the 80 foot stake. Usually one long side of the container is lined up with the left or right back bay wall. This wall is 10 feet to the left or right of the 80 foot stake. Then measure back the distance from the structure to the front of the container. Hint, the doors are on this end. Put two wire marker flags down to mark the corners of a long side of the container. Contact Devo at Heavy machinery to deliver container 23 and supervise its placement. I know it seems crazy but sometimes being off by one foot screws everything up. See: http://www.eugeneweb.com/gallery2/v/clif/BM/Structre_Setup/Can10/Corners
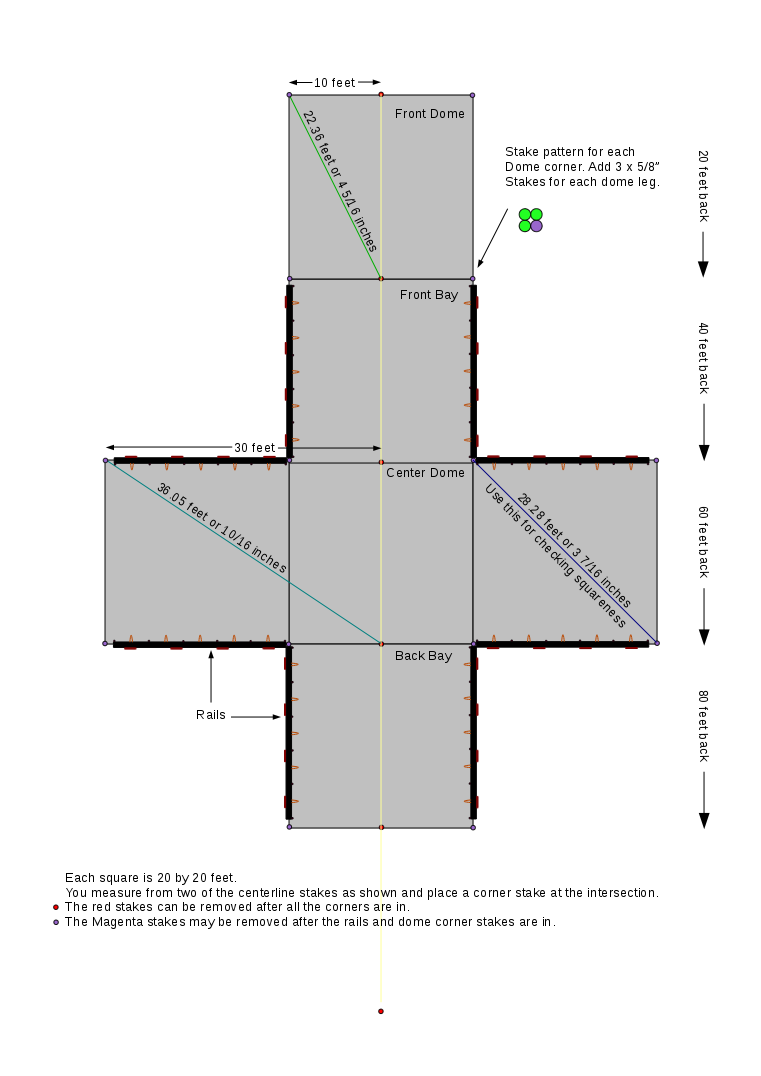
Next you can measure off of the rebar centerline to find the corners of the structure. You use the Pythagorean theorem with two intersecting tape measures to find the location of each corner, see figure below.- Drawing for finding corner stakes of structure:
Domes
Each dome gets special stakes in each corner. In fact one 4 foot and two 3 foot stakes go in each corner these should be 5/8" in diameter. The diameter is more important than the length. They should be in a small triangular pattern just to the inside of the corner marking stake, see above diagram. Please see the Inventory page for a list of parts.Rails
Like the domes the bays are also 20 by 20, and radiate out from the center dome. The rails make it faster to put down the supports for the ribs. The construction stakes which are smooth and about 5/8" in diamiter slide through the diagonal tubes and are driven into the gound holding down the rails. The stakes go on the outside and the wire loops go on the inside. The ends at the dome corners should just touch at one corner of the angle iron with the marking stake centered on the long axis of each rail. See the above diagram and this one at full size: http://www.eugeneweb.com/gallery2/v/clif/BM/Structre_Setup/08270008.jpg.html Notice that the rails are a little shorter than 20 feet. This is because pleats in the bay tarps reduce their length a bit.Prep materials
Get a couple of people working on sorting the PVC by size. Most of the ribs are 1" diameter, the end ribs are 1 1/4" with slightly larger couplers. There are a couple bags of rope dump them out on a rug or tarp and separate the 1/4" from the 1/8" and the really long from the short stuff. First you will need all the long 1/4" rope. Separate that into 50 footers and 100 footers. Next find the new tarps for the two domes, and two bays.Add to this the two new bay tarps that you brought. Now you have all (mostly) new tarps for the structure.If you're not sure which tarps you have try to shine a strong flashlight through it. they are completely opaque.Dome Assembly
First you need to start very early, like when the sun comes up. Because in the afternoon the wind comes up and if you try to pull the tarps on in the wind they will get ripped to shreds. Take all the 1-1/2" PVC and the 2" connectors. Some are sleeves some are crosses. There are 4 10 foot sections with 2" crosses in them for each dome, so 8 total. These connect to the 2" cross, which is about 2 feet across. That is the start of one dome. Remember all the wingnuts go down or you rip the tarps to shreds. The domes use the longer bolts from the jug of bolts, and there are extra in the tub of structure stuff. After you get the first four sectins with built in crosses bolted in you add 1-1/2 sections (all ten feet long) and 2" sleeves where needed until you have lengths of four sections each. So the special sections with crosses count as the first two sections in one run through the center cross. Then they get two sections on each side of their built in cross. Sometimes you need to gently hammer the bolts into the Holes, but not too hard or you will break the PVC. Its best to use the wooden or rubber mallet.See pics Here: http://www.eugeneweb.com/gallery2/v/clif/BM/Structre_Setup/08250064.jpg.html Once that's done get about 13 people and put one on the orchard ladder. The rest go on each leg, and three legs go in each corner. Remeber the corner stakes? Check out the dome rasing pictures here: http://www.eugeneweb.com/gallery2/v/clif/BM/Structre_Setup/08250069.jpg.html Then wrap the three legs in each corner tightly with the stronger high quality duct tape. like Nasua 357. About 4 or more feet off the ground. This makes it easier to tie off to later. The front corner's of the front dome also need some guy rops off at 45 degrees. Tie them at about 5 feet off the ground, and about 10 feet out. Now unfold a (newer) 30 foot square tarp and with some help from someone on the ladder, tie some ropes to a corner to two and pull it over the dome. Drive some larger diameter stakes at a 45 next to the outside of each corner. The Corners of the tarps get tied to these stakes with short random ropes but what actually holds the tarp down are two 50 foot 1/4" Nylon ropes. that criss cross the top.This is Critical if you forget this step the dome tarps will rip right off.Bay Assembly
There are six ribs on each bay the 4 inside ribs are 1" PVC, and the end ribs are 1-1/4" PVC The 1" ribs go together with the bell ends that the sections come with and some glued on 1-1/4 6" sections. There is extra glue in the tub labeled Structure stuff. Please put the ends without joints on the ground or you will run out of connectors. Each rib has three 10 foot sections. The larger 1-1/4 ribs have thinner sleeves (class 160 1-1/2" about 8" long) that slide on the sections and there are shorter 2-1/4? inch bolts with wingnuts to hold them together. Always put the wingnuts down. There is a jug of all these bolts and another jug or bucket of very large nails to be used to hold down the geo-tek floor covering much later. The ribs go on the vertical posts of the rails. If any are missing then you pound in a 4 foot skinny stake in it's place. Look at the pictures and the captions for some more details. The end ribs which are 1-1/4" diameter get threaded onto the long edges of a bay tarp. Then you slide the tarps on over the rest of the ribs. Here is a sequence: http://www.eugeneweb.com/gallery2/v/clif/BM/Structre_Setup/08270015.jpg.html After a tarp is on you can get a few people to work on the tiedown. You need to take a 100 foot 1/4" nilone rope fold it in half and start at the center leg of a corner of the center dome. You need to learn and use clove hitches for all the PVC: http://www.netknots.com/html/clove_hitch.html So start at the middle of a 100 foot rope and tie it off to the center pole on a dome corner. Then the two side legs and on to one side of the connecting bays. these guy ropes are tide about 6 feet off the ground above the bay rib joints so they don't slide down. You should have about 20 feet left over for the guys. Do this for all four corners of the center dome. The front bay is different because the ropes also get tied to the front dome corners and get tide off to the sides. Next take the thin rope which is 1/8" diameter, and find the last wire loop at one end of a rail. Then run the rope over the tarp to the other side and tie it off with a half hitch to the loop on that side. Next run it a couple of feet to the next loop down. tie a half hitch (do not run the rope through the wire loop. That is not necessary) and take the rest of the rope and toss it over the other side tie on more rope of the same length as you go. and keep going till your done. Every now and then you will need to tighten these plete ropes. Do that by untying the half hitches and pulling down untill tight. etc... Last take some shorter sections of rope about 30ish feet long and thread it through about 3 or 4 grommets on each edge of the center dome tarp. Now tie it off partway down the rails so it holds those flaps tight onto the joining bay tarps. Yea! you're pretty much done with the structural stuff. Go over all the ropes and check that they are tight and that the dome tarps have ropes over the tops to hold them down.See: http://www.eugeneweb.com/gallery2/v/clif/BM/Structre_Setup/09030010.jpg.htmlGeo-Tek Floor
There is a lot of loose weave black cloth. This is the geo-tek floor. You should also find a bucket or jug of very large nails. There are some more in one of the coolers. Lay out the floor the longest pieces first and fill in with the rest. Gently press the nails down every 10 feet or so on the edges and if you have a lot left over add them where it's helpfull.Decorations
Yea! it's decoration time! Do whatever you like here. There are some examples from different years at the end of the pictures. -- ClifCox - 2011-08-15

| I | Attachment | Action | Size | Date | Who | Comment |
|---|---|---|---|---|---|---|
| |
BM_Main_Struc_Layout.png | manage | 101 K | 19 Aug 2011 - 18:49 | ClifCox | Drawing for finding corner steaks of structure |
Edit | Attach | Print version | History: r8 < r7 < r6 < r5 | Backlinks | View wiki text | Edit wiki text | More topic actions
Topic revision: r8 - 24 Aug 2011, ClifCox
Ideas, requests, problems regarding Foswiki? Send feedback